Featured Photo

Featured Photo

“Red Line train to Glenmont.” Even with all the troubles that Metro has given us in recent history, the system is quite pretty. From the Brutalist architecture, to vistas on some of the fly over tracks, Metro can still provide beauty in our daily lives. And that’s before you take the time to do a long exposure of a train coming into a station.

Pablo certainly captured that beauty with this Red Line train entering Union Station. He caught it just right so that the individual cars run together at one end, making it look like a single car. And at the other end, there are the light lines streaming along. And if you look closely at those light lines, you’ll see the wonderful movement made in the long exposure; solid lights and letters moving together forming a unique pattern. And you can clearly read the station sign and the warning on the tracks through the train’s arriving movement. Quite the sight and always a pretty one to see.

By the way, if you’re interested in great photography, our friends over at Exposed DC are getting ready to kick-off their 2014 Exposed Photography Show. They’re having a launch party at Bluejacket tonight and it will be well worth going to. This juried photography show is going into their seventh year and it is always worth seeing (both Kerrin and myself, as well as many of our regular contributors, have had photos in previous years of the show). Hope to see many people at the party!
Featured Photo

Featured Photo

Time lapse videos have always fascinated me, particularly the ones showing traffic (like this one). These types of videos give the impression of incredible speed, even if the cars aren’t going that fast. To capture the essence of a time lapse video in one still photo is easier than you think; generally all you need is a decent camera, a tripod, and some traffic. But it’s also almost impossible to know exactly what you’re going to get. With long exposures you generally have to open the shutter and then figure out what photo you took. To get an interesting photo that’s more than just lines, you have to get lucky.

Take Kevin’s photo above. First there is the standard white/yellow colored headlights from oncoming traffic, giving the sense of movement. But what is that blur of multi-color in the middle? It’s a bus, with it’s front displays causing that play of light. Notice how the greenish-yellow coloring slowly fades as the position of the bus changes, relative to the camera. It’s the same with the red highlight lights, where they suddenly come into existence and just as suddenly stop. I can bet Kevin didn’t know exactly what he was going to get when that bus showed up along Pennsylvania Ave, but I’m also sure he wanted it in this shot.

Featured Photo

Featured Photo

Photo courtesy of TheRobbStory
Sweet Land of Liberty
courtesy of TheRobbStory

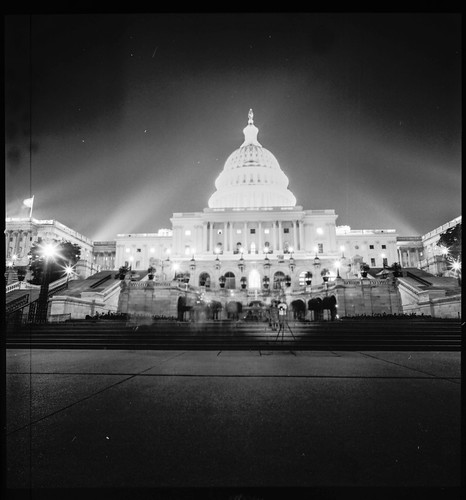
Normally an overexposed picture is not something a photographer wants. Washed out details and weird plays of light can ruin a shot. But, if done just right, an overexposed photo can add a fascinating depth too.

Take Robb’s photo above. It is a noticeably long shot; clocking in at an 8 minute exposure, it’s long even for a long exposure. With the shutter open for so long it allows the camera to pick up the entire light beams from the Capitol’s spotlights, creating a nice framing effect. Also, if you were to only take a quick glance, you’d think there were no people in the shot; but if you look closer, you’ll see the blurring effect of people’s movement at the base of the building. (Added bonus: Look really closely and you’ll see the distinct out line of a family portrait being taken.) The black and white film (yes, it is an analog shot) allows the viewer to focus more on the composition of the photo and not be distracted by any off colors. Yes, overexposed but not ruined, the shot is definitely a keeper.

Featured Photo

Featured Photo


…and the DJ Played All Night Long by Rolenz

I’m always awestruck when I see a photograph of star trails.  Like macro photographs, they show you things that your eyes can’t see on their own as well as show off the sexiness of photography.  While star trails can be captured with both film and digital cameras, digital gives you the advantage of creating a multiple exposure composite photo like the one above.  This shot, taken with a Nikon D90 near Skyline Drive, has an accumulated exposure time of about 60 minutes and is composed of twelve, 5 minute long exposures, taken at f/3.5, ISO 200, 18mm (according to the photographer).  Had this been shot with film, you would have to pray that your exposure was long enough to create the trails while not blowing out the light of the sunset.

Star trail photography takes a little bit of skill and a whole lot of patience.  You will definitely need a tripod of some sort, and make sure you have something in the foreground to make the shot more interesting.  Minimize the ambient light by getting as far away from city lights as you can and by shooting on a night with little to no moon.  You’ll likely want to use a wide angle lens and a big aperture to let in as much light as possible, and a low ISO setting to minimize noise.  If you have star trail photos of your own to share, leave them in the comments.